Showing posts with label scrapbook. Show all posts

Saturday, June 30, 2018

Paper Pumpkin Pop Up Blog Hop Broadway Star - June 2018


It’s time for another Pop Up Blog Hop!  This month’s kit has a matching product suite in the Stampin’ Up! catalog; the Broadway Bound Suite.  I know you will see a lot of projects in the hop that use this suite with the kit. 


However, I fell in love with the kit all on its own and could not wait to create a mini scrapbook as soon as I saw the fun envelopes. 


To make the scrapbook you will need a piece of Lemon Lime Twist card stock cut to 5 ¾” by 8 ½”.  Score at 5/8” down the short side.  This is the flap that will go over the final envelope.  To keep the bakers twine in place I used a hole punch to create a small half circle divot. 

Trim off the flap of each envelope (I used 5) at 5” as shown in the photo.  I layered them so that approximately two rows of the cute dotted stripe showed past the envelope on top. 
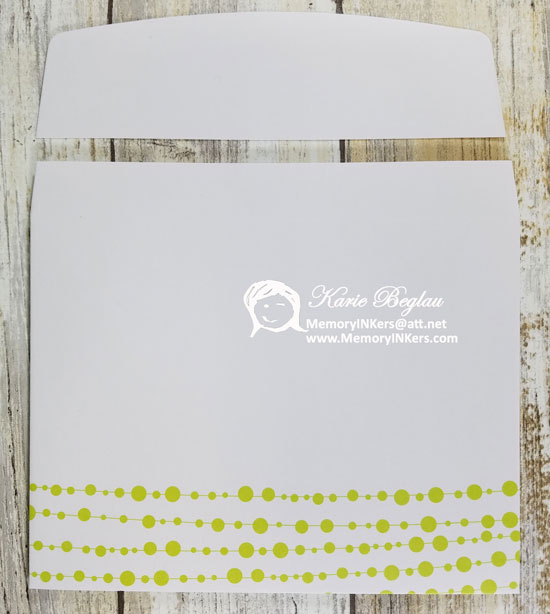
They are adhered to the Lemon Lime Twist card stock using Tear & Tape adhesive. Cut 1 of the dotted Lemon Lime Twist and 2 of the black stripe cards in half and place inside each envelope alternating the colors.  

The last piece of the black is adhered on the back ‘page’ onto the Lemon Lime Twist card stock. Each tab is made from the balloon stickers in the kit. In the video I explained where some of the other details came from.

Below is a close up of all the pages.


Lastly, I made my favorite card!  I saw house while creating the scrapbook when the black ‘marquee’ piece landed on top of one of the Lovely Lipstick rectangular sticker pieces. 

I used two dies from the At Home Framelits (pointed to in the below photo) to create the door and windows.  The door knob is made with one of the included pearls, the color in the windows was made with the light Pool Party Stampin’ Blends Marker.  And the sentiment is from the At Home With You stamp set.  The little Lovely Lipstick diamond shapes came from the window and…well…they are there to cover a few oops spots from messy fingers while stampers.


This is all the ‘stuff’ I had left after making my projects.  Plenty more fun to be had, wouldn’t you agree?


I hope you will scroll down to the end of this post and leave a note to let me know your thoughts.  Just remember to scroll back up and click the next button below to see what the next hopper, Cynthia, has to share with you.

https://bit.ly/2tjfvIO
Until Next time . . .
                   Hugs, Karie B.

Want to get in the monthly fun?  Click  the picture below to start getting your own monthly creativity in a box! 
https://mypaperpumpkin.com?demoid=33608


Current Special Offers
https://www.stampinup.com/ecweb/default.aspxEARN FREE HOSTESS BENEFITS! If you place an order by July 22nd, please use the Hostess Code: 3VMQD2XV You will be entered in a drawing for FREE Product on July 23rd.  


http://www.stampinup.net/esuite/home/kariebeglau/jointhefunI would love to have you join my Stampin’ Up! team and the Stampin’ Up! family.  With the new products coming soon you will be able to get your hands on them sooner than anyone else!  Contact me for more information or go to my website today!  www.kariebeglau.stampinup.net


Monday, October 2, 2017

Stampin' Up! Home Office


Stampin’ Up! 
Home Office Tour

For this week’s MemoryINKers Monday I thought I would share a 2-page layout I created a few years ago.  The Stampin’ Up! Home Office in Riverton, Utah, is Amazing!!  I love that I work from home and work for myself.  However, I would take a job here any day!  Although not pictured, they have a room filled with supplies so you can create on your break, there’s a Bean-Bag conference room too!  How fun!  Hmmmm…..I wonder how long I would be allowed to work there.  I am sure there is a limit to how much you can play while at work.


The above page features the front of the campus building with 300,000 feet of office space and sits on 55 acres, the Legacy Room where you can walk the path of Stampin’ Up! from the beginning, and the photo on the right is the Atrium, located behind the reception area. It is 11,000 square feet with a two-story red rock waterfall in the center.  Just to the left of the waterfall are table where the employees can relax and eat their lunches.  It is peaceful and beautiful!


Above you can see the elegant design of the wide corridors, bridges and class enclosed creative area (upper left of top photo). They call this The Great Hall.  It has tumbled marble floors and grand pillars.   The photo on the bottom shows the Distribution Center that is inside and behind the Corporate Offices.  Honestly the photo doesn’t show you the scale like being there.  This is just one small area.  It is 200,000 Square Feet!  On an average day employees’ processes over 5,000 orders!  Each order travels approximately a half mile on the warehouse conveyors belt during the picking and packing process.


FYI - Your stamps are made in another facility in Kanab Utah shown above.  This is where the company originally had its home office.  Stampin’ Up! will not close this facility as it is a main source of income for the area.  Below is a photo showing what Stampin’ Up! does with their excess red rubber after processing.  It is scattered in a park to make the playground soft and safe for the kids!  


 What a great idea!

I hope you enjoyed the tour!

If you would like to see more of my ideas, just use the one of the options in the upper right corner to follow me.   
I’d love to read your thoughts on this post.
 Please leave me a comment below the product list.

Until Next time . . .
                   Hugs, Karie B.

Below are the product codes and prices for the items used on these projects. Just click to order them for yourself today! 

Monday, September 18, 2017

Just Add Color


Colorful Memories

Adult coloring books have been all the rage for a while now.  As a crafter, especially a rubber stamper, I understand it.  Coloring with ink, markers, pencils, etc. is very relaxing.  That’s why I fell in love with the Just Add Color Specialty Designer Series Paper. I knew it would not just make great cards, but also great backgrounds for scrapbook pages. 


The page design I picked for this layout is filled with leaves gently swirling all around the page.  On the left page (shown on top) I cut approximately 1/3 of the DSP sheet giving it a half moon edge which I attached a 12” x 12” piece of Whisper White card stock.  Then I fussy cut several leaves from the remainder of the sheet and added them swirling around our family photos.  As we are a blended family we feel that joining together brought more color into our lives.  With that thought in mind I used Watercolor Pencils to add soft colors to the leaves in a windswept curve through the individual photos and a little onto the second page flowing to the family photo. 

It’s hard to see the colors in the photos so here’s a close-up.

I hope you enjoyed today’s scrapbook layout.


If you would like to see more of my ideas, just use the one of the options in the upper right corner to follow me.   

Until Next time . . .
                   Hugs, Karie B.

I’d love to read your thoughts on this post.
 Please leave me a comment below!

Below are the product codes and prices for the items used on these projects. Just click to order them for yourself today!